

Replicating a Postgresql 9.5 database using Slony1 2.2
Some Slony1 Concepts (Official Docs)
If you are familiar with slony concepts jump ahead to Start Replicating.
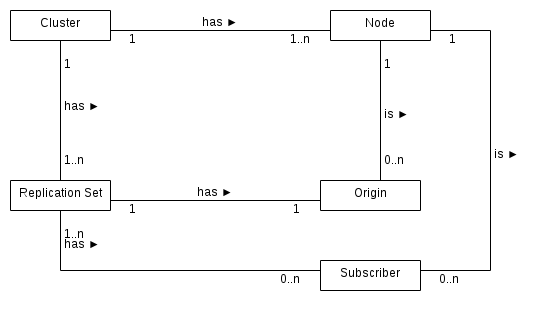
Node
Is a named PostgreSQL database instance that will be participating in replication.
Cluster
Is a named set of PostgreSQL database instances (i.e. nodes). Replication takes place between the set of database instances.
Replication Set
Is a set of tables and sequences that are to be replicated between the nodes.

Each replication set has an origin and can have zero to many subscribers.
The replication set is a key concept in the slony1 architecture. This concept provides the extended granularity, that allows slony1 to enable a variety of replication scenarios, that are not possible in other replication mechanisms. (Comparison of Replication Solutions
- Replicate only a selected subset of tables from a database
- Use a single database as the origin for some tables and the subscriber for another group of tables
- Use a single database to amalgamate data from multiple databases
ER Diagram of a Slony1 Cluster
Once you have an understanding of the above Slony1 concepts, and reviewed other replication solutions, you should be able to decide whether slony1 is the right solution for you.
Start Replication
Prerequisites
- Two servers with postgresql and slony setup [Click here for a tutorial on how to do that]
- A superuser login on both
Nodes( Not absolutely necessary to have superuser access but it makes it much easier to configure ) - Both hosts need to be able to accessible to each other
Setting up slony1 replication can be a highly involved task. Fortunately Slony1 source code comes with a few tools that make things much easier.
One of those tools, are the "altperl" scripts Source. If you followed my
tutorial in installing slony you would have these scripts in your $PATH.
Step One : Setup psql access
Login to the two hosts and create a superuser to be used only for replication.
The following command will create a superuser named slony
createuser -P -s -e slonyI usually create the two users with the same credentials just to make it easier to remember, but it can be different.
Once the two users are created allow each of them to login from the other host.
For this two things need to happen. First the postgresql servers must be listening on their public ips.
To make the servers listen on their public ips, find the postgresql.conf file and edit the
listen_addressesdirective.The
listen_addressesdirective can be set to '*' to listen on all ip addresseslisten_addresses = '*'Postgresql server needs to be restarted for this to take effect.
Second the newly created users should be allowed to login from the same server and the ip of the other host through psql using the password.
( i.e. psql -U [username] -W -h [origin-host] [db-name] and psql -U [username] -W -h [slave-host] [db-name] should both allow login in both hosts)
Editing the pg_hba.conf files to have the lines below, will achieve this task.
host    all             all             127.0.0.1/32          md5
host    all             [username]      [slave-host]/32    md5
Postgresql server needs to be restarted for this to take effect.
Step Two : Get the databases ready
You will probably have a database already in mind for replication on the origin node. If not you can set a test database as below
createdb -O [username] -U [username] -h [origin-host] $MASTERDBNAME
pgbench -i -s 1 -U [username] -h [origin-host] $MASTERDBNAME
The next steps should be done on the origin host
Step Three : Defining the cluster
In the origin host create the following folder structure.
mkdir -p /root/pgclusters/[cluster-name]
cd /root/pgclusters/[cluster-name]
Find the slon_tools.conf-sample file and copy it into the current folder
find / -type f -name 'slon_tools.conf*'
Example output
/usr/local/etc/slon_tools.conf-sample
cp /usr/local/etc/slon_tools.conf-sample .
mv slon_tools.conf-sample slon_tools.conf
The slon_tools.conf file is an helper file to help us define our cluster. This file has two main sections that need to be edited.
- Node structure
- Replication Set structure
The file also includes a lot of comments to help understand what each of the settings mean.
Edit the add_node function calls to represent your cluster.
For a cluster with two nodes it would look as below.
add_node(
    node     => 1,
    host     => '[origin-host]',
    dbname   => '$MASTERDBNAME',
    port     => 5432,
    user     => '[username]',
    password => '[password]',
);
add_node(
    node     => 2,
    host     => '[slave-host]',
    dbname   => '$SLAVEDBNAME',
    port     => 5432,
    user     => '[username]',
    password => '[password]',
);
Edit the replication set definition to represent your cluster. As defined earlier a replication set is a set of tables and sequences to be replicated. You can group the tables and sequences in your database as you wish, for a simple database you may define just one set.
"set1name" => {
    "set_id" => 1,
    "table_id" => 1,
    "sequence_id" => 1,
    "pkeyedtables" => [
        "table1",
        "table2",
        "table3",
    ],
    "sequences" => [
        "table1_id_seq",
        "table2_id_seq",
        "table3_id_seq",
    ],
}
If you define more than one set, make sure that the table_id for each of the sets is higher than the count of the tables in the previous sets. The same method should be used to set the sequence_id for each set as well.
For example adding another set to the above definition you would have to use a values larger than 3 for both table_id and sequence_id because there are 3 tables and 3 sequences in the previous sets.
It makes good sense to keep a reasonable gap between those values to allow you to add tables to previous sets at a later time.
Therefore an example would look like below
"set2name" => {
    "set_id" => 2,
    "table_id" => 10,
    "sequence_id" => 10,
    "pkeyedtables" => [
        "table4",
    ],
    "sequences" => [
        "table4_id_seq",
    ],
}
Step Four : Initialize the Cluster
Review the cluster initialize commands using the following command
slonik_init_cluster --config /root/pgclusters/[cluster-name]/slon_tools.conf
The output should be similar to below
Make sure that the username and password, host ips, database names, etc are correct
# INIT CLUSTER
cluster name = [cluster-name];
node 1 admin conninfo='host=[origin-host] dbname=$MASTERDBNAME user=[username] port=5432 password=[password]';
node 2 admin conninfo='host=[slave-host] dbname=$SLAVEDBNAME user=[username] port=5432 password=[password]';
init cluster (id = 1, comment = 'Node 1 - $MASTERDBNAME@[origin-host]');
# STORE NODE
store node (id = 2, event node = 1, comment = 'Node 2 - $SLAVEDBNAME@[slave-host]');
echo 'Set up replication nodes';
# STORE PATH
echo 'Next: configure paths for each node/origin';
store path (server = 1, client = 2, conninfo = 'host=[origin-host] dbname=$MASTERDBNAME user=[username] port=5432 password=[password]');
store path (server = 2, client = 1, conninfo = 'host=[slave-host] dbname=$SLAVEDBNAME user=[username] port=5432 password=[password]');
echo 'Replication nodes prepared';
echo 'Please start a slon replication daemon for each node';
If any of the information is incorrect then you must edit the slon_tools.conf file to correct the error(s) and run the above command again and review the output.
Once you are comfortable that the details are correct pipe the output of the above command to slonik using the below command
slonik_init_cluster --config /root/pgclusters/[cluster-name]/slon_tools.conf | slonik
The output would should be similar to the below
< stdin >:6: Possible unsupported PostgreSQL version (90501) 9.5, defaulting to 8.4 support
< stdin >:9: Possible unsupported PostgreSQL version (90501) 9.5, defaulting to 8.4 support
< stdin >:10: Set up replication nodes
< stdin >:13: Next: configure paths for each node/origin
< stdin >:16: Replication nodes prepared
< stdin >:17: Please start a slon replication daemon for each node
Once this is done, a slon daemon must be created for each node.
Step Five : Initialize slon daemons for each node
For this copy the following file to /root/pgclusters/
And then run the command
/root/pgclusters/start_nodes.pl --config /root/pgclusters/[cluster-name]/slon_tools.conf
This will start a slon daemon for each node in your slon_tools.conf configuration file, with a watchdog each.
Step Six : Create the replication sets
The next step is to create the sets defined in the slon_tools.conf we have created. To test the configuration type the command
slonik_create_set --config /root/pgclusters/[cluster-name]/slon_tools.conf 1
Here the 1 is the id of the set.
Make sure that the output contains output such as set add table( set id = 1, origin = 1, id = 1, full qualified name = '[schema].[tablename]', ...
for each table that you have configured in the slon_tools.conf file.
Similarly for each sequence set add sequence (set id = 1, origin = 1, id = 1, full qualified name = '[schema].[sequence-name]', ...
If the output is correct pipe the output to slonik command to actually create the set.
Create set 1
slonik_create_set --config /root/pgclusters/[cluster-name]/slon_tools.conf 1 | slonik`Output should be similar to below depending on the number of tables and sequences in the set.
< stdin >:11: Subscription set 1 (set1) created
< stdin >:12: Adding tables to the subscription set
< stdin >:16: Add primary keyed table public.table1
< stdin >:20: Add primary keyed table public.table2
< stdin >:24: Add primary keyed table public.table3
< stdin >:75: Adding sequences to the subscription set
< stdin >:79: Add sequence public.seq1
< stdin >:83: Add sequence public.seq2
< stdin >:87: Add sequence public.seq3
< stdin >:132: All tables added
Repeat this process for the number of sets you have defined. Remember to replace the 1 with the set id for each of the set id's in your configuration.
Step Seven : Subscribe nodes to the replication sets
As with all the previous helper scripts check the output of the slonik_subscribe_set command as below
slonik_subscribe_set --config /root/pgclusters/[cluster-name]/slon_tools.conf 1 2
Here 1 is the set id and 2 is node id of the subscriber.
The output should include the cluster name, the nodes and their connection info and a subscribe set command such as below.
subscribe set (id = 1, provider = 1, receiver = 2, forward = yes);
Once you have checked the output and decided that it is correct pipe the output of the command to the slonik script as below.
subscribe set to second node (1= set ID, 2= node ID)
slonik_subscribe_set --config /root/pgclusters/[cluster-name]/slon_tools.conf 1 2 | slonikOutput should be similar to below
:6: Subscribed nodes to set 1
Repeat the process according to the number of sets, each node needs to subscribe to. Here each node means all nodes not including the origin node.
Congratulations, you have a functional slony replication :)
If you need to stop the replication for some reason you could do so using the following command.
slon_kill --config /root/pgclusters/[cluster-name]/slon_tools.conf
This will stop both the slon daemons and the watchdogs.
Starting the replication backup can be done by just issueing the same command as before.
/root/pgclusters/start_nodes.pl --config /root/pgclusters/[cluster-name]/slon_tools.conf